Document Object Model
- Java Script에서는 문서 내 객체를 가져와 속성을 다루는 역할을 함

*document 내 Tag를 가져와 opacity와 color 속성을 변경하는 과정
DOM으로 가져오기
- 객체(Object)의 속성(Attribute)을 다루기 위해서는 우선 객체를 가져와야 한다.

<body>
    <h1>HI TAG 1</h1>
    <h1>HI TAG 2</h1>
    <h1>HI TAG 3</h1>
    <h1>HI TAG 4</h1>
    <h1>HI TAG 5</h1>
    <h2 class="head2">H2 Tag 1</h2>
    <h2 class="head2">H2 Tag 2</h2>
    <h2 class="head2">H2 Tag 3</h2>
    <h2 class="head2">H2 Tag 4</h2>
    <h3 id="head3">H3 Tag</h3>
</body>
<script>
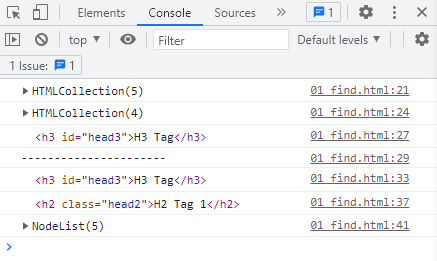
    var elemTag = document.getElementsByTagName('h1');   //Elements : 배열로 가져옴
    console.log(elemTag);

    var elemClass = document.getElementsByClassName('head2');
    console.log(elemClass);

    var elemId = document.getElementById('head3');   //Element : 값 하나만 가져옴
    console.log(elemId);

    console.log('----------------------');

    //css selector를 사용할 수 있다
    elemId = document.querySelector('#head3');
    console.log(elemId);

    //사용은 편리하나 하나밖에 가져올 수 없다
    elemClass = document.querySelector('.head2');   //값 하나만 가져옴
    console.log(elemClass);

    //querySelectorAll을 사용하면 다 가져올 수 있다
    elemTag = document.querySelectorAll('h1');      //배열로 가져옴
    console.log(elemTag);
</script>
Element 내의 속성 활용 하기
- 가져온 Element(요소)에서 Attribute(속성)을 다룰 수 있다.
- 다룰 수 있는 속성은 사용자 속성과 기본속성으로 나눌 수 있다.


<body>
    <h1 id="p1"></h1>
    <img id="image" src="../img/img01.jpg"/><br/>
    <input type="text" value="아무 내용이나..."/>
    <a href="#" my-attr="header">링크 클릭</a>
    <a href="#" my-attr="main">링크 클릭</a>
    <a href="#" my-attr="footer">링크 클릭</a>
</body>
<script>
    //my-attr은 사용자 속성
    var elem = document.getElementById('p1');
    elem.innerHTML='새로운 텍스트 등장';      //html 값을 변경(value 값이 없으면 가져옴)
    elem.style.backgroundColor = 'yellow';
    console.log(elem);

    var img = document.getElementById('image');
    //src 속성을 바꾸는 방식
    //img.src='../img/img02.jpg'; //일부 건드릴 수 없는 속성이 있다
    img.setAttribute('src','../img/img03.jpg'); //모든 속성을 수정할 수 있다

    //id를 제외한 나머지는 배열로 담겨서 들어옴
    var input = document.getElementsByTagName('input');
    console.log(input[0]);
    input[0].value='click';
    input[0].setAttribute('type','button');

    var tags = document.getElementsByTagName('a');
    console.log(tags);

    for(var i=0; i<tags.length; i++){

        var attr = tags[i].getAttribute('my-attr');
        console.log(attr);
        tags[i].innerHTML = '<h1>' + attr.toUpperCase() + '</h1>';//toUpperCase() : 대문자로 바꿈
    }

    //기본속성
    console.log(elem);
Event
- 어떤 “사건”을 의미
- “~가 일어난다면...” 이 event라고 생각 할 수 있다.
- Event를 등록하는 방식은 속성추가 방식과 Event Listener 방식이 있다.

- 등록할 수 있는 이벤트는 굉장히 많으나 Browser마다 조금씩 다름(on~~)
- 가장 일반적으로 사용하는 이벤트 속성

</head>
<!--html 문서가 모두 읽히면 일어나는 이벤트-->
<body onload="alert('loading 끝')"> <!--한 요소에 여러개 이벤트를 걸 수 있다-->
    <div onmouseover="mouseEvt('over')" onmouseout="mouseEvt('out')"></div>
    <br/>

    <!--span(inline 속성이 있는 div) : 특정 문자열을 지정할 때 사용-->
    <h3>오늘의 날짜 : <span id="demo"></span></h3>
    <input type="button" value="날짜추출" onclick="getDay(event)"/>
    <br/>
    <input type="text" id="keyon" value="" onkeydown="going()"/>
    <input type="text" id="keyup" value="" onkeyup="typing()"/>
    <h4 id="typing"></h4>
    <select id="mySelect" onchange="select()"> <!--onchange : 주로 Select에서 많이 사용-->
        <option value="Audi">Audi</option>
        <option value="BMW">BMW</option>
        <option value="Benz">Benz</option>
    </select>
</body>
<script>
    //해당 요소에 걸 수 있는 이벤트 목록을 볼 수 있다
    var elem = document.getElementsByTagName('body');
    console.log(elem);

    function mouseEvt(flag){
        console.log(flag);
        var tag = document.getElementsByTagName('div');
        tag[0].innerHTML = 'mouse ' + flag;
        if(flag == 'over'){
            tag[0].style.backgroundColor = 'red';
        }else{
            tag[0].style.backgroundColor = 'yellowgreen';
        }

    }

    function getDay(evt){
        //이벤트 발생 시 이벤트에 관련된 모든 정보를 이벤트 객체로 전달해줌
        console.log(evt);
        console.log(Date());
        var date = Date();
        /*var span = document.getElementById('demo');
        console.log('span')
        span.innerHTML = date;
        */
        document.getElementById('demo') = Date();
    }

    function going(){
        //console.log('key down');
        //키를 누르는 순간에 이벤트가 발생하여 input에 value가 입력되기 전에 값을 가져오려고 함
        //그래서 한박자씩 느리게 반응하는 것으로 보임
        //키를 누르는 것을 감지하는 기능을 만들 때 사용
        var val = document.getElementById('keyon').value;  //. : 다음에 입력되는 값을 불러와라
        console.log(val);
    }

    function typing(){
        var val = document.getElementById('keyup').value;
        console.log(val);

        document.getElementById('typing').innerHTML = val;
    }

    function select(){
        //1단계 : 이벤트 발생 시 함수 호출 여부
        console.log('change');

        //2단계 : 원하는 태그가 가져와졌는지 확인
        var elem = document.getElementById('mySelect');
        console.log(elem);

        //3단계 : 원하는 속성(가져오기|수정하기)
        var val = elem.value;
        console.log(val);
        document.getElementById('typing').innerHTML = val;
    }
</script>'코딩도전기 > Dom' 카테고리의 다른 글
| 부모창_자식창 코드리뷰 (0) | 2023.02.10 |
|---|---|
| CODO Day8_Java Script_DOM (0) | 2023.02.10 |
| CODO Day7_Java Script_DOM (0) | 2023.02.09 |
| DOM_TEST (0) | 2023.02.09 |


